Xerox Transfers with Embossing:
I get asked all the time how I do the text in the background of my artwork, and so I thought I would let you in on my most favorite secret! I use this technique with my Drawing 1 students, teaching them how the background of their artwork is just as important as the foreground and subject matter. I also use this technique to take my Drawing 2 student’s sketchbook drawings and turn them into final pieces. Teaching them that the prep work, can lead to final results that are incredible! So here is my little secret, if you decide to use it… send me pictures of what you and your students create!
Supplies Needed:
Birch Panels (5x7) (a ton of different sizes available!)
Chartpak Colorless Blender Marker (there is also an awesome pen caddy for your classroom!)
Text to Transfer (Must be a Mirror Image, and Must be a TONER copy)
Embossing Pens (VersaMarker Pen)
Embossing Powder (Ranger Embossing Powder Metallics)
Prismacolor Colored Pencils/ Watercolor Painting Supplies
Heat Gun (I use this one, but pretty much any heat gun will do!)
Directions for Transferring:
Start by creating a contour drawing of an animal directly on your wood panel, and outline in pen *waterproof pens work best, so they do not bleed into the wood grain.
Using your text copies, add text or images into the background of your drawing.
Place your Text face down on the area you would like to transfer it, secure it with tape.
Use the Chartpak Colorless Blender on the back side of your paper, while wearing gloves, and use the cap of the marker to rub the area abrasively to transfer the toner onto the wood.
Lift your paper up, and see how it looks!
Tips & Tricks
You can have your students draw their contour on a separate piece of paper, and then make a copy of it to transfer it! This is fun for students, because they can play with composition, sizing, etc. Most libraries have copiers that have a “mirror image” setting, and “copy ratio” which allows you to increase the size of the image, or decrease it!
The lighter you press when transferring, the more vintage, distressed, or light your transfer will become.
Once you have transferred something one time, you cannot go back and transfer that same text again. You have one chance!
Xylene (the chemical in the transfer markers) is toxic, remember to keep your doors open in your classroom while using it, and insure that your students are being responsible (wearing gloves, and preventing skin contact).
Have your students do their transfers in the hallways, or outside to prevent air fumes in the classroom.
YOU CAN USE THIS IN PHOTOGRAPHY!!! I have my students print their photographs (in color or in B&W) and transfer their photos onto wood! Be sure to have students mirror their image in Photoshop before printing.
Directions for Embossing:
Using the Emboss It Pens draw where you would like to add your metallic pop of color.
Lightly sprinkle the Embossing Powder over the area you put your embossing liquid. You do not have to work too quickly.
Tap off the excess powder onto a scrap piece of paper. (You can reuse this later!)
Once you have powder in your desired area, use the heat gun to melt the powder- you can see that your powder has now become shiny and metallic!
Let your embossing dry completely before touching it! It will smear if the powder is still melted when you touch it.
Tips & Tricks:
Hold the heat gun about three inches from the embossing powder to seal/melt your powder into place.
Use the embossing as highlights in your drawing to add that little glimmer of light!
Metallic embossing looks awesome near the eyes of your subject matter (next to the catch light) to make the eyes sparkle!
Metallic Lines in the background of your image can add to the text transfers and tie everything together.
If your heat gun has a low setting, start there so that the powder does not end up flying away :)
Painting/ Drawing Techniques To Teach Your Students with this Project:
Teach your students CONTOUR DRAWING. Contour Drawing trains your students mind/eyes to actually LOOK at what they are drawing. In Drawing 1, I start students off my doing contours of their hands, but in Drawing 2 I let them do an animal!
Line Quality. Teach your students to add line quality into their contour drawings by adding areas of thickness where they want the viewers eyes to be drawn. Encourage them to create smooth, cohesive, and sure lines rather than the chicken scratch that they tend to do. For shading, you can teach them about hatching/cross-hatching with pen to add value.
Teach students to create their own colors. Make it a rule that they cannot use BLACK or BROWN in these paintings/drawings. This will force them to see that other colors can be used to substitute for colors that are voids/distractions in their artwork.
Start BRIGHT & VIBRANT! Tell your students to start obnoxiously bright with their colors. You can always dull things down, but you can’t redeem a muddy drawing/painting!
MAKE THEM BE LOOSE. My students hate me for this, but I force them to be carefree with this project. My drawing students are told to use watercolor pencils, starting with very bright colors. I come around the room with a spray bottle and spay their artwork unexpectedly. This gives their artwork a loose bottom layer and adds texture. Then as this bottom layer drys, they can start building up the animal’s details with a bit more control.
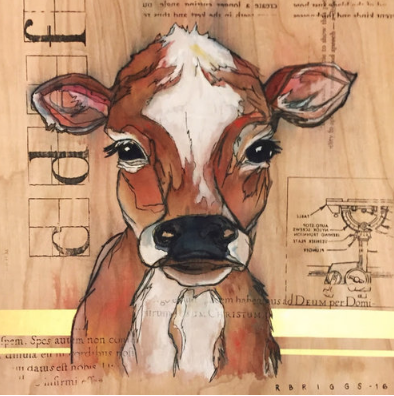
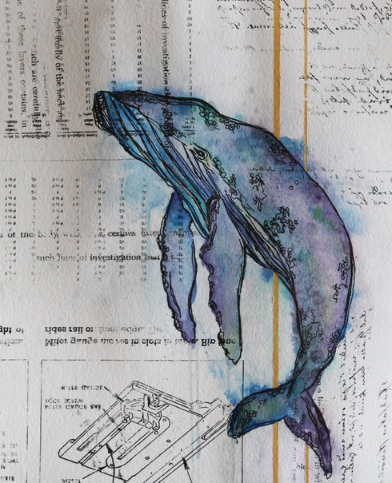
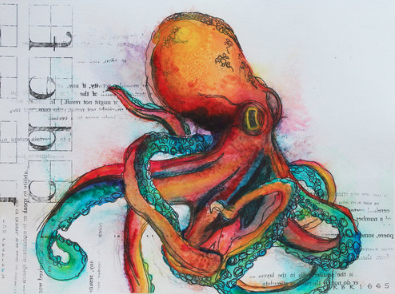
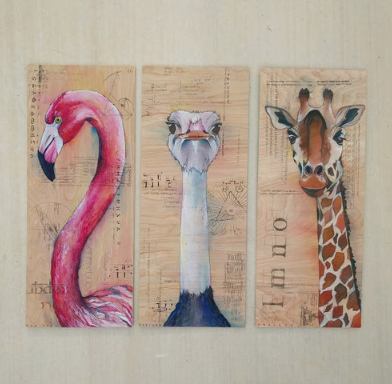
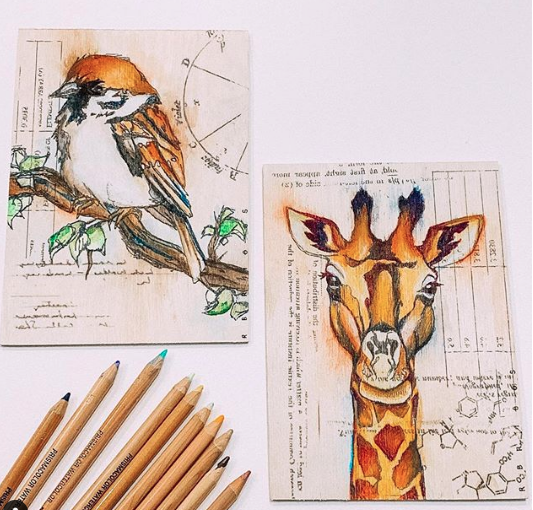
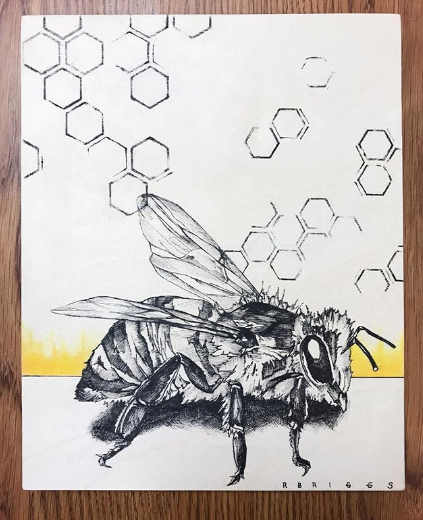
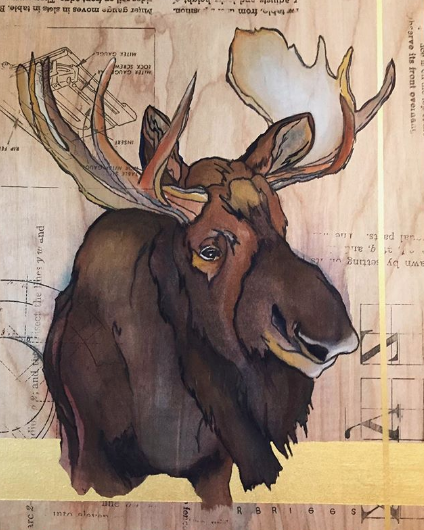
Below are some of my personal examples using Xerox Transfers and/or Embossing! Follow me on Instagram to see more of my personal artwork @rbriggsart.